Fitting a bathroom from scratch — or fully refitting an existing one — is one of the most involved trades jobs in domestic work. It crosses plumbing, carpentry, tiling, electrical, and finishing, and the sequencing of each stage matters as much as the product selection. Done in the right order with the right materials, the result is a room that performs reliably and holds up for fifteen or twenty years. Done without a clear plan, it is one of the most expensive rooms in the house to put right.
This guide works through the full fit sequence, from layout planning to final sealant, and flags the product choices that make a meaningful difference at each stage.
Planning the Layout
The layout is fixed by the position of the soil stack, the existing hot and cold supplies, and the floor structure. Extending the soil run adds cost and can cause drainage problems if fall and vent requirements are not met — wherever possible, keep the WC close to the existing stack connection.
Mark out the full room on a scale drawing before ordering anything. Include the swing arc of the door, the enclosure door opening, the cistern depth, and a 200mm clear zone in front of the WC pan. A bathroom that works on paper does not always work when the products arrive: check that the enclosure tray fits wall-to-wall within the tiled dimensions, not the bare wall dimensions.
Confirm the floor structure can take the dead weight of a full cast-iron bath or a tiled wet room floor before finalising the layout.
Shower Installation: Enclosure and Tray
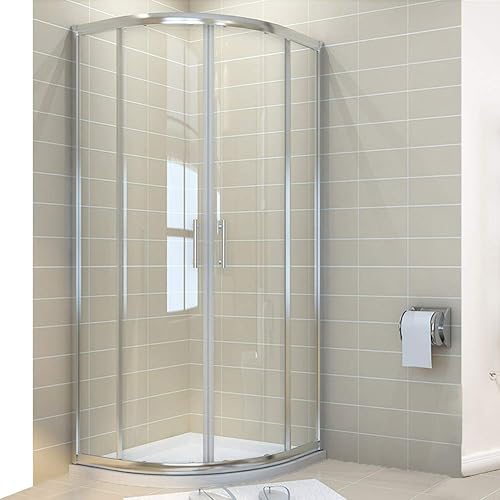
The enclosure is typically the first major item to set out, as it governs the surrounding tile layout. The ELEGANT Quadrant Shower Enclosure 900mm is a practical entry-level option for a corner position, offering 6mm safety glass, a reversible door, and a low-profile tray. Check that the walls are plumb before fitting the frame — enclosures have limited adjustment and a wall that is out of true will show as a visible gap at the frame-to-tile joint.
Set the tray before tiling. Bed it level on mortar or proprietary pads, check it with a spirit level in both directions, and confirm the waste outlet aligns with the trap position below. The tray must be solid underfoot: any flex will crack the grout at the tray-to-tile junction and eventually open the joint to water ingress.
For the shower valve, a thermostatic bar mixer is the correct specification for both comfort and compliance with Part G of the Building Regulations, which requires protection against scalding in new and fully refurbished dwellings. The Grohe Grohtherm 1000 Thermostatic Shower Mixer is a widely used two-handle surface-mounted valve with separate temperature and volume controls, and it suits a straightforward horizontal pipe arrangement at the wall. For a concealed alternative with a cleaner tile face, the Hansgrohe Ecostat Thermostatic Shower Mixer requires first-fix rough-in of the body before tiling and is the better choice in a new-build or full gut-and-refit.
Both valves require balanced hot and cold supplies. Where the system is gravity-fed with low flow rates, consider fitting a shower pump. The Salamander CT50 Xtra Shower Pump is a twin-impeller positive-head pump that boosts both hot and cold supplies simultaneously — ensuring the valve receives equal pressure on both inlets, which is essential for accurate thermostatic function.
Where a separate hot water cylinder is not available and an electric supply is more practical, the Mira Sport Electric Shower 9.8kW draws cold mains water and heats on demand. It must be on a dedicated circuit — typically 40A or 45A — installed and certified by a Part P-registered electrician.
WC and Frame
A wall-hung WC requires a concealed cistern frame set into a studwork housing. The Grohe Rapid SL WC Frame is a robust and commonly specified frame that adjusts in height to suit floor-to-ceiling conditions and accepts pans from most manufacturers. Set the frame plumb and true before building out, as any racking in the studwork will be amplified when the pan is hung.
The Roca The Gap Rimless Wall Hung WC pairs well with the Grohe frame. Rimless pan geometry makes cleaning significantly easier and removes the recessed ledge that traps soil — it is now the expected standard in a quality fit. Fit a soft-close seat: the SA Products Soft Close Toilet Seat is a straightforward and economical option with a quick-release hinge for cleaning access.
Commission the flush before boarding and tiling. Adjust the cistern float to achieve the correct flush volume and check the flush valve seating under sustained flow. Any slow drip from the valve will be inaudible behind a tiled wall for months before it becomes apparent — check it properly at the frame stage.
Basin and Vanity Unit
A floor-standing vanity unit with an integrated basin reduces the number of components to co-ordinate and provides useful under-basin storage. The Nuie Vault Vanity Unit with Basin is a well-specified option with a pre-drilled basin and integrated overflow, available in widths to suit most standard bathroom layouts. Position it against a stud or solid wall: a basin carrying a stone top is heavy, and the waste connection must align cleanly with the soil run without excessive horizontal travel.
Use a compression-fit bottle trap rather than a push-fit version in a vanity unit — push-fit joints in an enclosed cabinet are harder to inspect and more likely to fail slowly without being noticed.
Ventilation
Mechanical ventilation is required under Building Regulations Part F in any bathroom without an openable external window, and is best practice in all bathrooms regardless. Inadequate ventilation is the primary cause of mould growth in bathrooms — addressing it at the fit stage costs far less than remediation later.
The Envirovent SIL100T Silent Extractor Fan operates at a very low noise level and includes a programmable overrun timer, which keeps the fan running for a set period after the light is switched off. This is the most effective way to remove residual moisture from a shower without relying on occupant behaviour. Install it at high level and duct to outside as directly as possible — each 90-degree bend in the duct adds resistance and reduces effective airflow.
Electrical connection of the fan must comply with Part P. In a zone 1 or zone 2 position, use an IP-rated unit appropriate for that zone.
Tiling Preparation
Tiles are only as good as the surface behind them. In a shower enclosure or wet area, use a waterproofed substrate — either a cement backer board such as HardieBacker or a tanked board system. Standard plasterboard will absorb moisture over time even through grout and adhesive, and will eventually delaminate.
Apply a liquid waterproofing membrane to the tray perimeter, all internal corners, and any penetrations before tiling. Tape internal corners with fabric tape bedded in the membrane — these are the highest-risk movement joints in the shower. Allow the membrane to fully cure before applying tile adhesive.
Use a flexible tile adhesive in wet areas rather than a standard powdered adhesive. In large-format tile layouts, back-butter tiles as well as the substrate to achieve full coverage — voids behind tiles in a wet area allow water to migrate and will eventually cause tiles to drop.
Sealants
The final silicone seal is what stands between a watertight bathroom and a costly leak. It must be applied to clean, dry, grease-free surfaces — any residual soap film, dust, or old sealant will cause adhesion failure.
The UniBond Anti-Mould Silicone Sealant is a reliable sanitary-grade silicone with a fungicide incorporated into the compound, which significantly extends the period before mould begins to grow on the surface. Apply it in one smooth continuous bead and tool it off within the open time stated on the cartridge. Mask both sides of the joint before applying to get clean, straight edges.
For corners, movement joints, and any situation where the sealant also needs to function as an adhesive — for example, bonding a bath panel, fixing a splashback section, or securing a mirror — the CT1 Sealant and Construction Adhesive is a cross-platform adhesive-sealant with very high initial grab that remains flexible after curing. It adheres without primers to most bathroom substrates including wet surfaces.
Fixings for Bathroom
A tiled wall presents a specific challenge for fixings: the tile must not crack under drilling, and the fixing must reach into the substrate behind — not simply into the adhesive bed. Use a suitable tile drill bit and slow drill speed to pass through the glaze cleanly before the substrate. For hollow or studwork walls, use a cavity anchor rated for the load.
The Fischer DuoPower Wall Plug Assortment covers the most common fixing sizes and works across solid brick, block, and board substrates. For anything load-bearing — grab rails, large mirrors, heavy shelving — locate the stud and fix directly through the tile into timber wherever possible.
Never use a standard knock-in wall plug in a tiled wall. The expansion action risks cracking the tile face at the point of insertion.
Plumbing Considerations
Use barrier pipe throughout the hot and cold runs in the bathroom where the pipework passes through the screed or within a boarded void — barrier pipe prevents oxygen ingress into the system and extends the life of ferrous components such as the boiler heat exchanger and radiator connections.
Isolating valves on every supply to every fitting — shower valve, basin tap, WC cistern, and towel rail — are not a luxury. They allow individual items to be serviced or replaced without draining the system. Fit them at first-fix and leave them accessible.
The Milano Chrome Heated Towel Rail should be plumbed as the last component on the bathroom circuit, as it typically carries the lowest heat requirement. Bleed it thoroughly at commissioning and recheck after the first heating cycle — towel rails trap air readily and will run cold across the top until fully bled.
Take time with the commissioning stage. Fill, check for leaks at every joint, flush the system through, and run the shower at temperature before signing off the installation. A bathroom fit that is rushed at the end is where the callbacks come from.